Make a Balloon Animal
Visit my gallery page to find instructions
for all balloons previously posted.
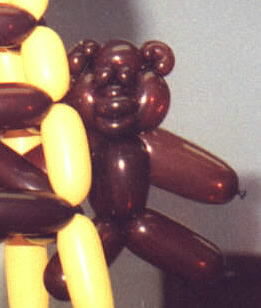
Orangutan
I learned my first balloon sculpture from the book Balloon Magic.
by Marvin Hardy . Marvin
posted the instructions for this orangutan to
Balloon HQ in 1996.
I have made the drawing to supplement his verbal instructions
and present them here.
Instructions

Head and Face:
1. Inflate a 260Q leaving approximately 8 inches uninflated. Form a 1 1/2 inch
bubble at the knot end of the balloon. This 1 1/2 inch bubble will form the
back of the head.
2. Form a 1 inch pinch twist.
Twist the pinch twist in half to form the eyes.
(toe twist)
3. Form a 1/2 inch bubble for the nose, followed by a 1/2 inch pinch twist.
This pinch twist will be the upper lip.
4. Form a second 1/2 inch pinch twist. This pinch twist will be the lower lip.

5. Form a 1/2 inch bubble for the chin, followed by a 1 1/2 inch bubble for one
side of the face, a 1/2 inch bubble for one ear, a 1 inch bubble for the top of
the head, a 1/2 inch bubble for the second ear, and a 1 1/2 inch bubble for the
other side of the head. Twist the two 1 1/2 inch bubbles together forming a 5
bubble loop.

6. Tuck the 1 1/2 inch bubble at the knot end of the balloon through the loop to
hold the eyes, nose, and lips in position.
7. Pinch twist the two 1/2 inch bubbles for the ears.
8. Pull the knot at the end of the balloon down and wrap it around the twist at
the base of the head.
NOTE: You can have the eyes a different color with the following steps:
Make a pinch twist in another balloon for the eyes.
Twist this pinch twist in half for the eyes, then deflate the remainder of this
balloon and cut it off approximately 1 inch from the twist.
Wrap the deflated end around the twst two or three times to prevent the pinch
twist from untwisting.
Wedge the twist in this pinch twist into the twist at the end of the first 1 1/2
inch bubble before tucking this bubble through the 5 bubble loop in step 6. The
two bubbles form the eyes. Form the rest of the figure following the
instructions below.
Body, arms, and legs:
9. Form a 1/2 inch bubble for the neck, followed by a 2 inch bubble, a 1/2 inch
bubble, a 2 inch bubble, three 1/2 inch bubbles, a 2 inch bubble, a 1/2 inch
bubble, and another 2 inch bubble. Twist the first and fourth 2 inch bubbles
together to form a 9 bubble loop. This loop will be the arms.
10. Form a 2 inch bubble for the body, followed by a 1 1/2 inch bubble, two 1/2
inch bubble, and another 1 1/2 inch bubble. Twist the two 1 1/2 inch bubbles
together to form the legs and feet.
If you are lucky, there will be a very small bubble left at the end of the
balloon for the tail. You may have to make it a few times to get it just right
but keep trying. It's worth it.
11. Pinch twist the first and fifth 1/2 inch bubbles in the arm loop for the
elbows, and the second and fourth 1/2 inch bubbles for the hands.
Pop the third
1/2 inch bubble to separate the arms. I usually twist the two pinch twists that
form the hands in half but it is only a personal preference.

(Variation on the body, but the face is the same)
According to Web Counter
you are visitor number

Yes, the wallpaper is a stereogram!
|